
How to Install Side Panels on a Bikes At Work Trailer
Bikes At Work trailers have U-bolts installed along the sides of the trailer for mounting your own removable side panels. These side panels are useful for advertising your product or service, keeping loose cargo like brush or tree branches from getting caught in the wheel spokes, or keeping road spray from the trailer wheels from splashing on your cargo in wet weather. However, they can make it more difficult to secure your load in the trailer (especially if you've installed a floor in your trailer) since you no longer can easily loop tie-downs over the side rails of the trailer.
You can make the sides from any rigid sheet material (plywood, plastic, aluminum, etc). We recommend using corrugated plastic (aka Coroplast®). It is rugged, lightweight, waterproof, UV-resistant, easy to work with using simple hand tools, and available in a variety of colors. It is commonly used for inexpensive outdoor signs and can be found at any sign-making shop. If you want custom graphics on your side panels, the sign shop can put them on the panels for you for a small additional fee.
Like the trailer, the side panels described below are modular. This allows you to continue to use your panels when you shorten or extend your trailer. You will need two side panels for every section of your trailer; i.e., a 32 trailer will require two panels, a 64 trailer will require four panels, and a 96 trailer will require six panels.
Corrugated plastic is available in two thickness, 4 mm and 10 mm. The instructions below describe how to make side panels using 4 mm thick corrugated plastic, as it is less expensive and available in more colors. If you are using another material, skip step 1 and start at step 2.
Materials
| Item | Quantity | Note |
|---|---|---|
| side panel | 2 per frame section |
Each panel should be 32" / 76 cm long. The height can be any amount you choose. If you plan to carry plastic storage containers on the trailer inside the side panels, make sure there is enough space for the containers to fit between the panels. If space is tight, the top of the side panels should be below the bottom of the containers handles so you have enough space to lift the containers out with your hands. In any case, we suggest a maximum height of about 30" / 76 cm; otherwise, you won't be able to easily reach your cargo when loading and unloading. If using corrugated plastic, the flutes should be parallel to the 32" long edge. You should also add 4" / 5 cm to the height so you can create create stiffening ribs on the top and bottom of the panel (described below). 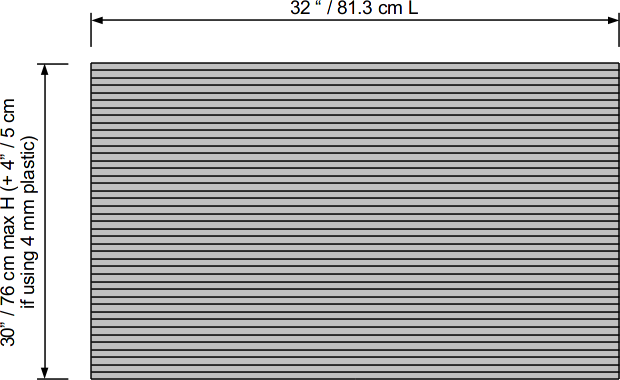
|
| tubular stakes | 4 per frame section |
The stakes can be made of any round material (pipe, electrical conduit, etc.) that is 0.8-1.0" / 20-25.4 mm in diameter. The length of the stakes should be 2.5" / 6.3 cm longer than the final height of the sides. 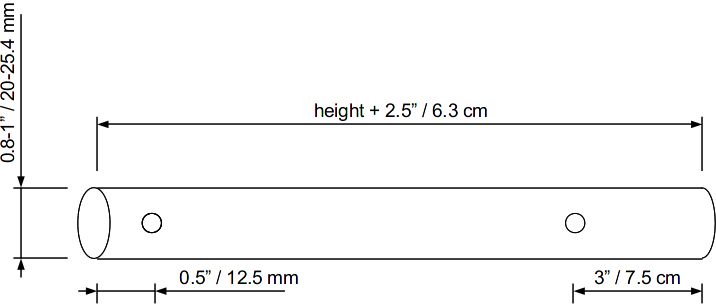
|
| screws and nuts | 8 per frame section |
The screws need to be long enough to go through the combined thickness of the stake and side panel. For 4mm thick corrugated plastic, screws 1/4" x 1.75" or M6 x 45 mm work well. |
Instructions
-
(4 mm corrugated plastic only) If using 4mm thick corrugated plastic, the panels need to be stiffened to make an effective side panel. The easiest way to do this is to create some stiffening ribs. To do this, slit one side of one flute 1" from the top and bottom edges of the panels using a utility knife and straight edge or coroplast cutter (see below). Flip each panel over and cut another slit 1" from the previous slit on the other side. Fold back the edges as shown.
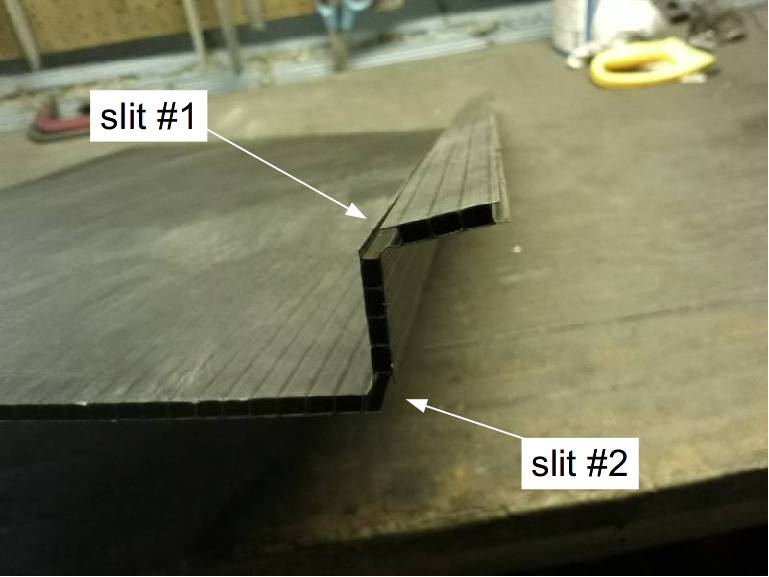
corrugated plastic panel after slitting opposite faces of the panel 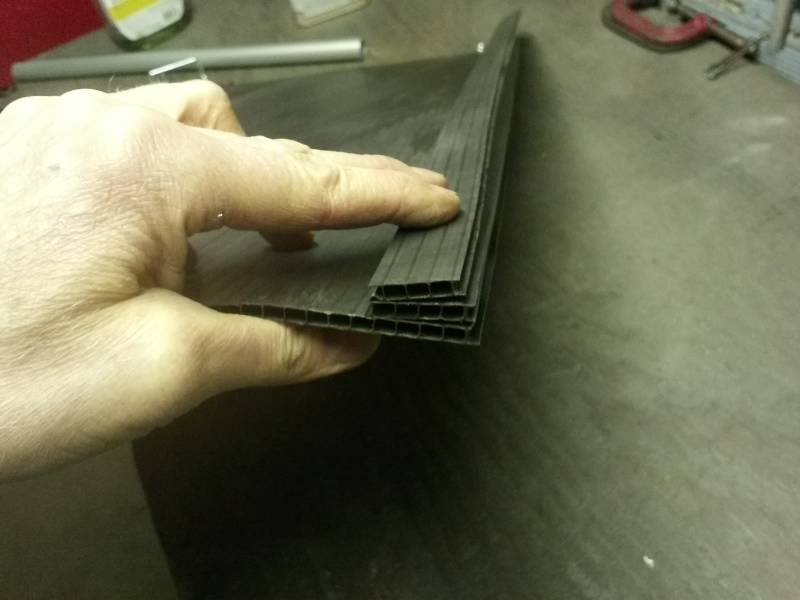
strengthening rib made by folding back 4 mm corrugated plastic panel Corrugated plastic is easy to cut using a utility knife, but I sometimes have trouble cutting straight lines parallel to the flutes using one. A coroplast cutter makes this task trivially easy to do, but they are expensive. If you have a sign shop cut your plastic for you, ask them to slit the sides for you, too.
a corrugated plastic cutter makes slitting the panels very easy -
Make four holes to fit your bolts in the corners of each panel in the locations shown below. Make the holes slightly oversize so you can make small adjustments to the spacing between the stakes if necessary later. (A small soldering iron works very well for cutting these holes in corrugated plastic. It melts the plastic and fuses the folds together. A punch or nail heated over a flame would probably work, too.)
On 4mm corrugated plastic, you will need an additional hole in the middle of the stiffening rib (see below) to keep the rib from unfolding. Again, a soldering iron works well for this, but if you don't have one, simply punch or drill a hole in the plastic and secure using a screw and nut.
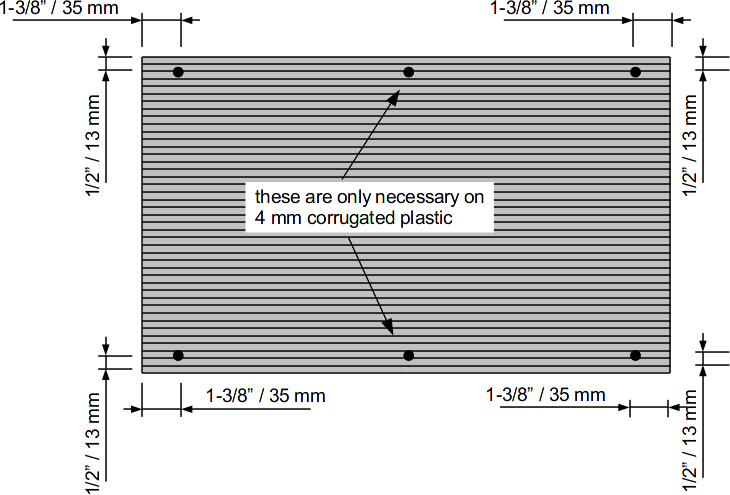
hole locations in side panel 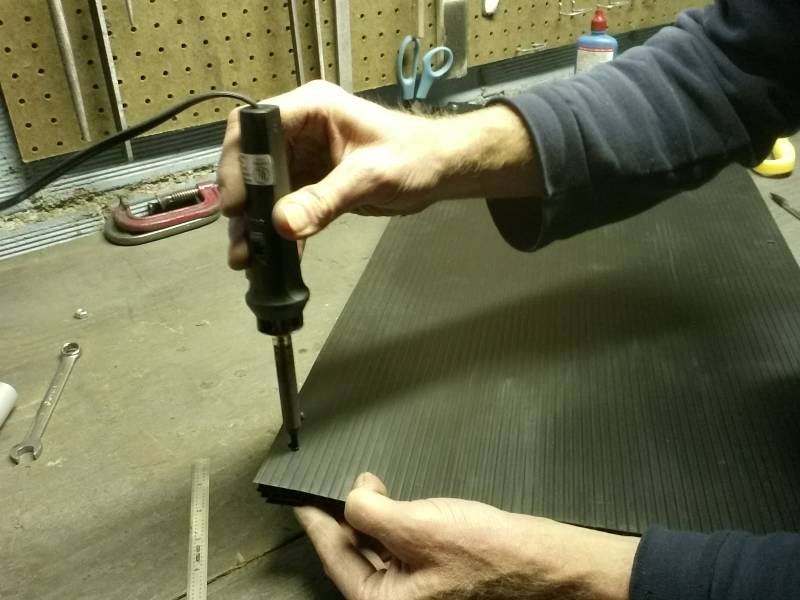
making holes in plastic panel using a soldering iron -
Check the fit of your stakes under each of the U-bolts on your trailer. If a stake won't fit or is too loose under a U-bolt, loosen the lock nut on the U-bolt, pull out the U-bolt slightly, and adjust the position of the stop nut on the U-bolt. Push the U-bolt and stop nut back against the frame and recheck the fit. Continue adjusting the locknut position and rechecking the fit until the stake is a slip fit underneath the U-bolt. Remove the stake and tighten the locknut.
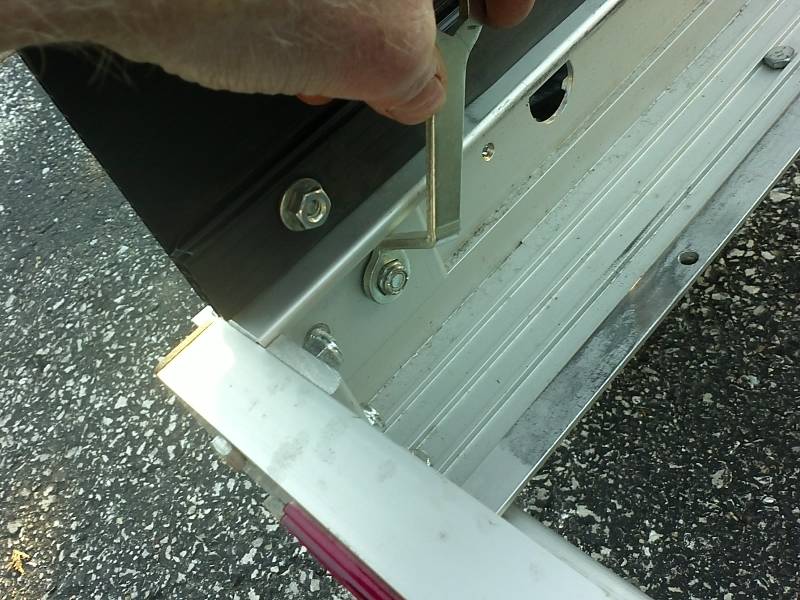
locknut on end of U-bolt inside the trailer frame 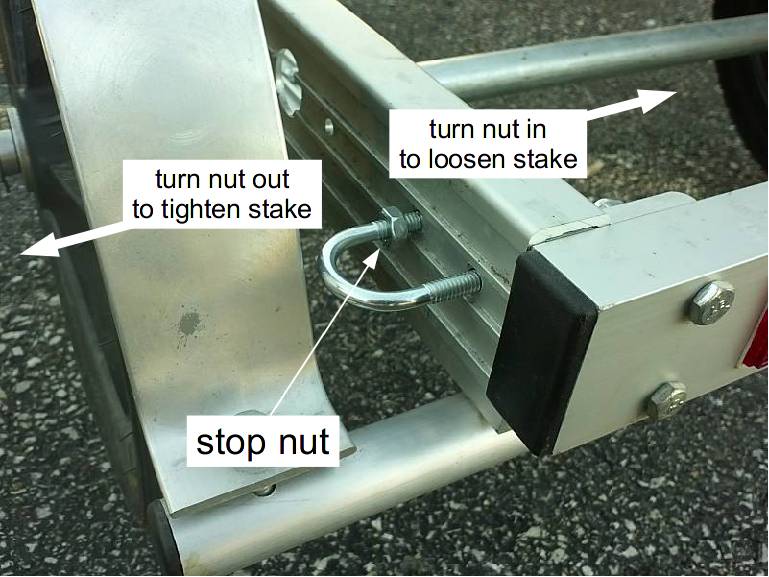
adjust the stop nut to set the depth of the U-bolt and thereby the fit of the stake inside it 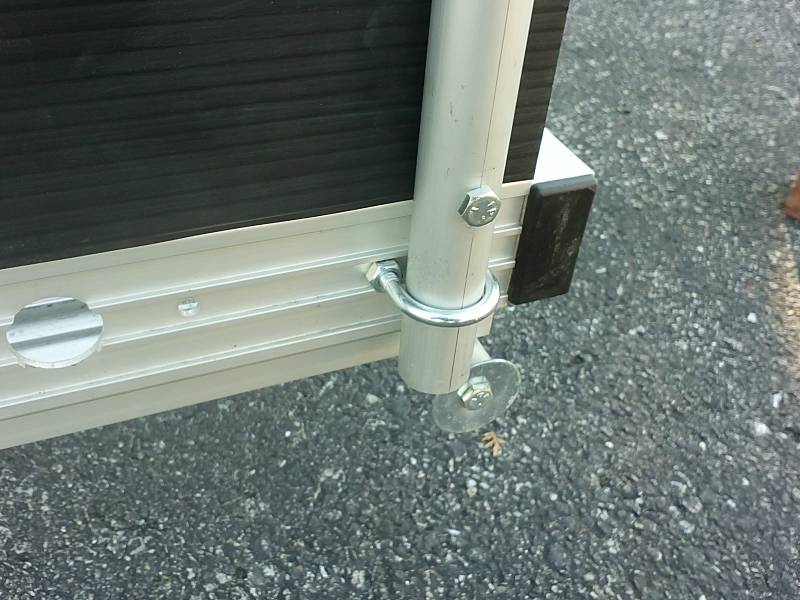
properly adjusted U-bolt with stake inserted -
Drill two holes in each stake to match the spacing of the holes in your panel as shown in the drawing below. Fasten two stakes to each panel using two screws and nuts per panel.
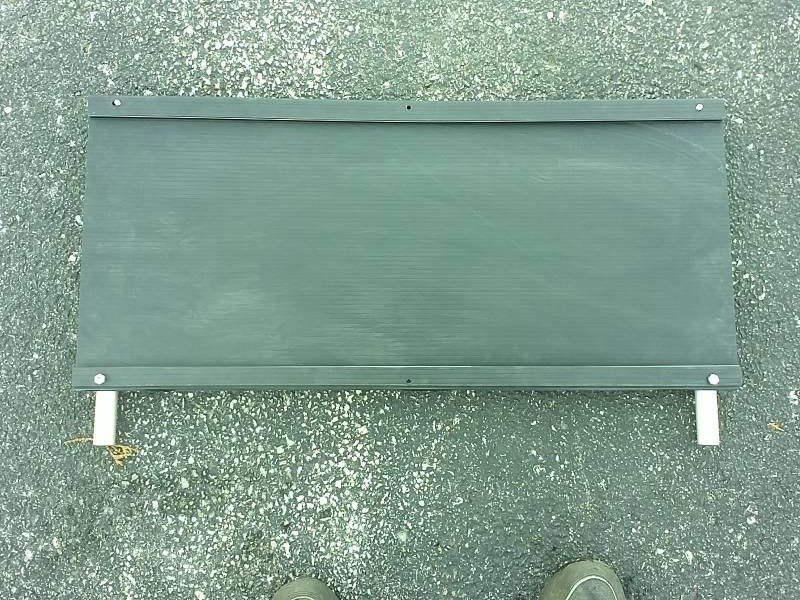
back (inside) face of finished side panel 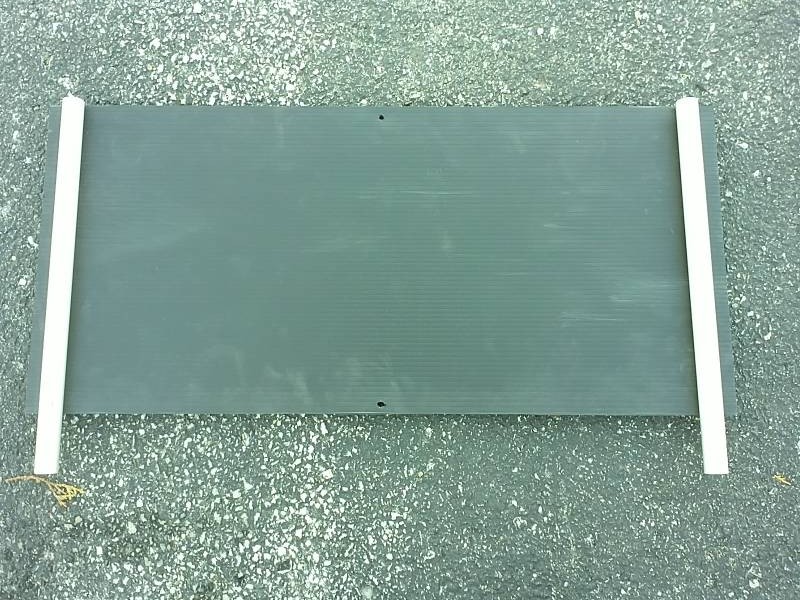
front (outside) face of finished side panel -
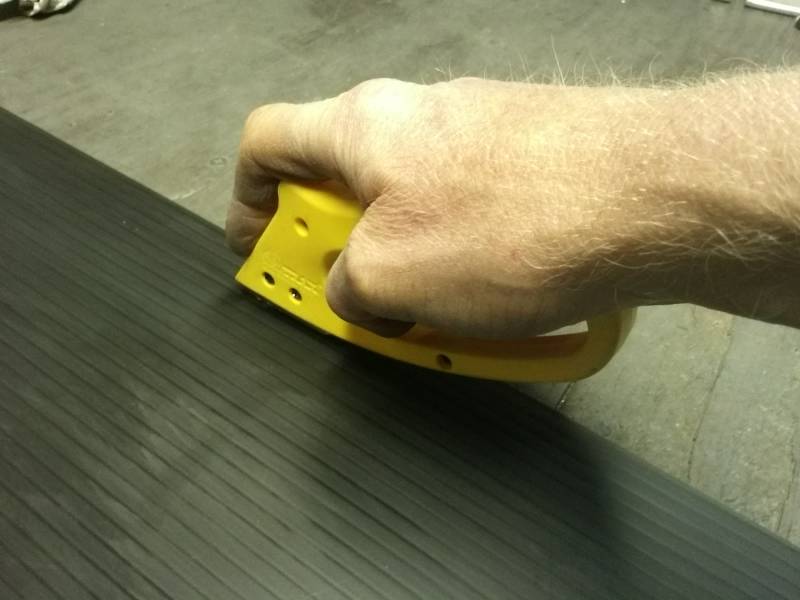
Mount the side panels to the sides of the trailer by sliding the stakes under the U-bolts.

finished side panels on trailer
End Panels
Before making end panels, make sure you really need them. They can add a significant amount of drag to the trailer both loaded and empty. If the only purpose of your side panels is for advertising purposes or to keep your cargo out of the wheels, you are probably better off without end panels.
If you still feel you need them, you'll need to fasten the end panels either to the side panels you just made or to the rectangular crossmembers on the ends of the trailer. We recommend fastening them to the side panels only; it makes removing them easier when you remove the side panels. On the front panel, you will need to cut out a portion of the bottom of the panel to leave space for the towbar clamp spacer block.